前言 View的三大流程之一:测量要解决的问题就是画多大 的问题。我们都知道,Android的View结构是一个多叉树,在这么一个数据结构之下,对于每个节点View,它们是如何独立解决画多大 这个问题呢?
本文将从源码的角度,分析View的测量代码,尝试探索View是如何解决画多大 的问题。
View的测量 从上篇文章:Android View体系 - performTraversals篇 可以知道,测量的入口在ViewRootImpl的performTraversals方法内的performMeasure方法,点进去看看:
1 2 3 4 5 6 7 8 9 10 11 12 13 14 15 public final WindowManager.LayoutParams mWindowAttributes = new WindowManager .LayoutParams();... private void performTraversals () { ... performMeasure(childWidthMeasureSpec, childHeightMeasureSpec); ... } private void performMeasure (int childWidthMeasureSpec, int childHeightMeasureSpec) { ... mView.measure(childWidthMeasureSpec, childHeightMeasureSpec); ... }
performTraversals内部调用了performMeasure方法,而performMeasure又调用了View的measure方法:
1 2 3 4 5 public final void measure (int widthMeasureSpec, int heightMeasureSpec) { ... }
首先它是public final的,外部可以调用,但不允许子类重写,主导View的测量流程:
1 2 3 4 5 6 7 8 9 10 11 12 13 14 15 16 17 18 19 20 21 22 23 24 25 26 27 28 29 30 31 32 33 public final void measure (int widthMeasureSpec, int heightMeasureSpec) { ... final boolean forceLayout = (mPrivateFlags & PFLAG_FORCE_LAYOUT) == PFLAG_FORCE_LAYOUT; final boolean specChanged = widthMeasureSpec != mOldWidthM || heightMeasureSpec != mOldHeightMeasureSpec; final boolean isSpecExactly = MeasureSpec.getMode(widthMeasureSpec) == MeasureSpec.EXACTLY && MeasureSpec.getMode(heightMeasureSpec) == MeasureSpec.EXACTLY; final boolean matchesSpecSize = getMeasuredWidth() == MeasureSpec.getSize(widthMeasureSpec) && getMeasuredHeight() == MeasureSpec.getSize(heightMeasureSpec); final boolean needsLayout = specChanged && (sAlwaysRemeasureExactly || !isSpecExactly || !matchesSpecSize); if (forceLayout || needsLayout) { mPrivateFlags &= ~PFLAG_MEASURED_DIMENSION_SET; int cacheIndex = forceLayout ? -1 : mMeasureCache.indexOfKey(key); if (cacheIndex < 0 || sIgnoreMeasureCache) { onMeasure(widthMeasureSpec, heightMeasureSpec); mPrivateFlags3 &= ~PFLAG3_MEASURE_NEEDED_BEFORE_LAYOUT; } else { long value = mMeasureCache.valueAt(cacheIndex); setMeasuredDimensionRaw((int ) (value >> 32 ), (int ) value); mPrivateFlags3 |= PFLAG3_MEASURE_NEEDED_BEFORE_LAYOUT; } ... } ... mMeasureCache.put(key, ((long ) mMeasuredWidth) << 32 | (long ) mMeasuredHeight & 0xffffffffL ); }
从代码中可以看出,只有forceLayout || needsLayout为true,才会有可能去执行测量逻辑。
forceLayout - 取决于是否有PFLAG_FORCE_LAYOUT 这个flag,一般在requestLayout方法调用后会带这个flag
needsLayout - 取决于传递过来的MeasureSpec:
specChanged - MeasureSpec是否有改变
isSpecExactly - 宽高都为match_parent
matchesSpecSize - 宽高是否跟上次的测量结果相同
进入到if分支,如果是强制布局,就会走测量流程:调用onMeasure;否则就会使用上次的缓存,调用setMeasuredDimensionRaw保存结果。
最后将测量结果保存到缓存中,测量结束。
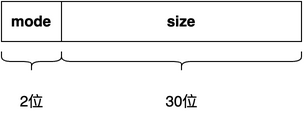
MeasureSpec 在测量过程中,频繁出现MeasureSpec的身影,MeasureSpec是什么?我认为是父View对子View的约束,子View需要在这个约束之下进行测量。MeasureSpec的结构如下:
可以从图中看出:
size ∈ [1, 2^30^ -1]
mode ∈ { EXACTLY, AT_MOST, UNSPECIFIED }
size代表尺寸,mode是MeasureSpec内部定义的与LayoutParams相关的三种模式,如下:
MeasureSpec.mode
对应的LayoutParams
含义
EXACTLY MATCH_PARENT、指定值测量前View就知道它该多大
AT_MOSTWRAP_CONTENT测量前View不知道该多大,自适应模式,尺寸不能超过size
UNSPECIFIED/
父View对子View的尺寸不做限制
mode和size的解封装,只需要使用位操作即可:
1 2 3 4 5 6 7 8 9 10 11 12 13 14 15 16 17 18 19 20 21 private static final int MODE_SHIFT = 30 ;private static final int MODE_MASK = 0x3 << MODE_SHIFT;public static int makeMeasureSpec ( @IntRange(from = 0, to = (1 << MeasureSpec.MODE_SHIFT) - 1) int size, @MeasureSpecMode int mode ) { ... return (size & ~MODE_MASK) | (mode & MODE_MASK); } @MeasureSpecMode public static int getMode (int measureSpec) { return (measureSpec & MODE_MASK); } public static int getSize (int measureSpec) { return (measureSpec & ~MODE_MASK); }
onMeasure measure方法是final的,不允许子类重写。为了子类能够自定义他们自己的测量逻辑,View暴露了一个protected的onMeasure方法,允许子类自定义自己的测量流程,但不允许外部调用。
onMeasure方法的默认实现,仅仅只是设置了一下测量结果:
1
2
3
4
5
6
7
8
9
10
11
12
13
14
15
16
protected void onMeasure (int widthMeasureSpec, int heightMeasureSpec) { setMeasuredDimension(getDefaultSize(getSuggestedMinimumWidth(), widthMeasureSpec), getDefaultSize(getSuggestedMinimumHeight(), heightMeasureSpec)); } protected final void setMeasuredDimension (int measuredWidth, int measuredHeight) { ... setMeasuredDimensionRaw(measuredWidth, measuredHeight); } private void setMeasuredDimensionRaw (int measuredWidth, int measuredHeight) { mMeasuredWidth = measuredWidth; mMeasuredHeight = measuredHeight; mPrivateFlags |= PFLAG_MEASURED_DIMENSION_SET; }
ViewGroup的测量 如果说没有子View的View是叶子节点,那么ViewGroup就是有孩子节点的View。
既然View的数据结构是一个多叉树,那么包含有子View的ViewGroup是如何测量的呢?
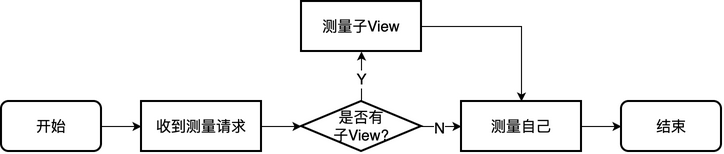
显而易见,ViewGroup需要先测量它的所有子View,然后根据测量结果,才能测量自身。如果把View当做一棵树来看,测量的过程就是后序遍历。
因此,对于每个View节点,其测量过程必然是这样的:
检查ViewGroup的代码发现,ViewGroup并没有重写onMeasure方法,需要找ViewGroup的子类验证父View与子View的测量逻辑。以FrameLayout为例:
1 2 3 4 5 6 7 8 9 10 11 12 13 14 15 16 17 18 19 20 21 22 23 protected void onMeasure (int widthMeasureSpec, int heightMeasureSpec) { ... int maxHeight = 0 ; int maxWidth = 0 ; for (int i = 0 ; i < count; i++) { final View child = getChildAt(i); measureChildWithMargins(child, widthMeasureSpec, 0 , heightMeasureSpec, 0 ); final LayoutParams lp = (LayoutParams) child.getLayoutParams(); maxWidth = Math.max(maxWidth, child.getMeasuredWidth() + lp.leftMargin + lp.rightMargin); maxHeight = Math.max(maxHeight, child.getMeasuredHeight() + lp.topMargin + lp.bottomMargin); ... } setMeasuredDimension(resolveSizeAndState(maxWidth, widthMeasureSpec, childState), resolveSizeAndState(maxHeight, heightMeasureSpec, childState << MEASURED_HEIGHT_STATE_SHIFT)); ... }
FrameLayout在测量的时候,先会遍历其子View,调用measureChildWithMargins方法,挨个进行测量,找到最大的高度和宽度,最后调用setMeasuredDimension,将最大高度和最大宽度设置为测量结果,测量基本结束。
从整个过程来看,关键方法就是measureChildWithMargins,其作用就像它的命名一样,带上margin测量子View:
1 2 3 4 5 6 7 8 9 10 11 12 13 14 15 protected void measureChildWithMargins (View child, int parentWidthMeasureSpec, int widthUsed, int parentHeightMeasureSpec, int heightUsed) { final MarginLayoutParams lp = (MarginLayoutParams) child.getLayoutParams(); final int childWidthMeasureSpec = getChildMeasureSpec(parentWidthMeasureSpec, mPaddingLeft + mPaddingRight + lp.leftMargin + lp.rightMargin + widthUsed, lp.width); final int childHeightMeasureSpec = getChildMeasureSpec(parentHeightMeasureSpec, mPaddingTop + mPaddingBottom + lp.topMargin + lp.bottomMargin + heightUsed, lp.height); child.measure(childWidthMeasureSpec, childHeightMeasureSpec); }
查看measureChildWithMargins方法发现,它会计算出新的MeasureSpec,然后调用子View的measure方法,把MeasureSpec传递给子View去测量。而计算出新的MeasureSpec的关键逻辑,都藏在了getChildMeasureSpec方法内:
1 2 3 4 5 6 7 8 9 10 11 12 13 14 15 16 17 18 19 20 21 22 23 24 25 26 27 28 29 30 31 32 33 34 35 36 37 38 39 40 41 42 43 44 45 46 47 48 49 50 51 52 53 54 55 56 57 58 59 60 61 62 63 64 65 66 67 68 69 public static int getChildMeasureSpec (int spec, int padding, int childDimension) { int specMode = MeasureSpec.getMode(spec); int specSize = MeasureSpec.getSize(spec); int size = Math.max(0 , specSize - padding); int resultSize = 0 ; int resultMode = 0 ; switch (specMode) { case MeasureSpec.EXACTLY: if (childDimension >= 0 ) { resultSize = childDimension; resultMode = MeasureSpec.EXACTLY; } else if (childDimension == LayoutParams.MATCH_PARENT) { resultSize = size; resultMode = MeasureSpec.EXACTLY; } else if (childDimension == LayoutParams.WRAP_CONTENT) { resultSize = size; resultMode = MeasureSpec.AT_MOST; } break ; case MeasureSpec.AT_MOST: if (childDimension >= 0 ) { resultSize = childDimension; resultMode = MeasureSpec.EXACTLY; } else if (childDimension == LayoutParams.MATCH_PARENT) { resultSize = size; resultMode = MeasureSpec.AT_MOST; } else if (childDimension == LayoutParams.WRAP_CONTENT) { resultSize = size; resultMode = MeasureSpec.AT_MOST; } break ; case MeasureSpec.UNSPECIFIED: if (childDimension >= 0 ) { resultSize = childDimension; resultMode = MeasureSpec.EXACTLY; } else if (childDimension == LayoutParams.MATCH_PARENT) { resultSize = View.sUseZeroUnspecifiedMeasureSpec ? 0 : size; resultMode = MeasureSpec.UNSPECIFIED; } else if (childDimension == LayoutParams.WRAP_CONTENT) { resultSize = View.sUseZeroUnspecifiedMeasureSpec ? 0 : size; resultMode = MeasureSpec.UNSPECIFIED; } break ; } return MeasureSpec.makeMeasureSpec(resultSize, resultMode); }
getChildMeasureSpec方法不长,但它在父子View的测量中起着承上启下的关键作用,因为它是父View(ViewGroup)对子View测量约束的直接体现。
为什么这么说?查看这个方法的入参,大致可以分为两部分:
spec - 父View的MeasureSpec
padding, childDimension - 子View的LayoutParams
本质而言,这个方法就是就是将父View的MeasureSpec和子View的LayoutParams转化成新的MeasureSpec,最后将这个新的MeasureSpec通过子View的measure方法传递给子View,以达到约束子View测量的目的。这个新的MeasureSpec就是父View对子View测量行为的约束。
那么,getChildMeasureSpec是如何将父View的MeasureSpec和子View的LayoutParams转化成新的MeasureSpec呢?这张表格可以概括:
childLayoutParam
parentMode
EXACTLY
AT_MOST
UNSPECIFED
<tr>
    <td style="text-align:center">match_parent</td>
    <td style="text-align:center">EXACTLY + size</td>
    <td style="text-align:center">AT_MOST + size</td>
    <td style="text-align:center">UNSPECIFIED + size</td>
</tr>
<tr>
    <td style="text-align:center">wrap_content</td>
    <td style="text-align:center">AT_MOST + size</td>
    <td style="text-align:center">AT_MOST + size</td>
    <td style="text-align:center">UNSPECIFIED + size</td>
</tr>
<tr>
    <td style="text-align:center">指定值</td>
    <td style="text-align:center">EXACTLY + childDimension</td>
    <td style="text-align:center">EXACTLY + childDimension</td>
    <td style="text-align:center">EXACTLY + childDimension</td>
</tr>
其中:
size是父View的尺寸减去padding
childDimension是子View的LayoutParams
通过getChildMeasureSpec将父View的MeasureSpec和子View的LayoutParams转化成新的MeasureSpec后,父View在measureChildWithMargins方法中,直接调用子View的measure方法,子View开始测量。
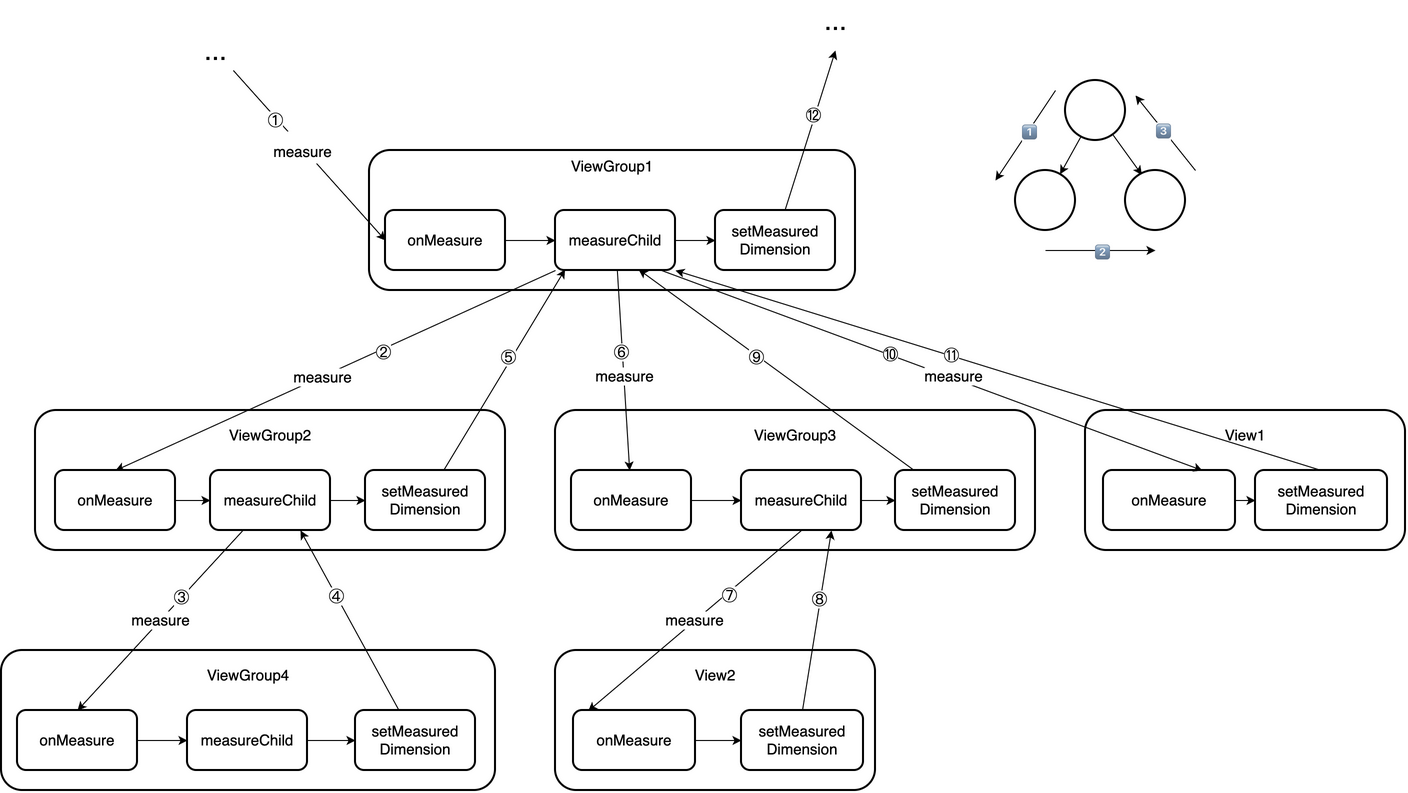
更一般地,一个View在收到测量请求后,会首先计算出新的MeasureSpec,然后再传递给子View,子View又开始测量;如此往复,直至传递到叶子节点 —— 一个没有子View的View。
叶子节点View测量完毕后,调用setMeasuredDimension将测量结果保存下来,叶子节点View测量完毕,此后调用链开始回归。
调用链回归是自底向上的,从底层到顶层逐级测量并调用setMeasuredDimension将测量结果保存下来,直至回归到顶级View。
因此,一棵View树的测量,大致可以分为两个流程:
自顶向下传递测量请求,传递计算出来的新的MeasureSpec
自底向上逐级测量,并设置测量结果
以上过程可以用一张图来概括:
打破约束? 管中窥豹,从FrameLayout的测量逻辑中,我们可以发现一棵View树的测量是:
从根节点到叶子结点层层传递约束、发起测量请求
从叶子结点到根节点执行测量保存结果
那如果子View打破这种约束会怎么样?或者说子View能不能打破这个约束?
MEASURED_STATE_TOO_SMALL 还是以FrameLayout为例,测量结束后,最终会调用setMeasuredDimension设置测量结果:
1 2 3 4 5 setMeasuredDimension(resolveSizeAndState(maxWidth, widthMeasureSpec, childState), resolveSizeAndState(maxHeight, heightMeasureSpec, childState << MEASURED_HEIGHT_STATE_SHIFT));
FrameLayout在测量完毕后,调用resolveSizeAndState方法将测量结果重新包装一次,而后再将其设置为测量结果,看看resolveSizeAndState内部做了什么:
1
2
3
4
5
6
7
8
9
10
11
12
13
14
15
16
17
18
19
20
21
22
23
// View.java public static int resolveSizeAndState(int size, int measureSpec, int childMeasuredState) { final int specMode = MeasureSpec.getMode(measureSpec); final int specSize = MeasureSpec.getSize(measureSpec); final int result; switch (specMode) { case MeasureSpec.AT_MOST: if (specSize < size) { result = specSize | MEASURED_STATE_TOO_SMALL; } else { result = size; } break; case MeasureSpec.EXACTLY: result = specSize; break; case MeasureSpec.UNSPECIFIED: default: result = size; } return result | (childMeasuredState & MEASURED_STATE_MASK); }
入参是:
size - 期望的测量结果
measureSpec - 父View传递给FrameLayout的MeasureSpec
childMeasuredState - FrameLayout子View的测量状态
其返回值取决于父View给的MeasureSpec和期望的测量结果:
当父View的测量模式是AT_MOST时:
父View在测量之前不知道自己多大,但父View的父View又把它的尺寸限制在了specSize以内。如果此时期望的测量结果size > specSize ,就会被带上MEASURED_STATE_TOO_SMALL 的标记;
当父View的测量模式是EXACTLY时:
父View在测量前就知道自己有多大,FrameLayout的测量结果就是父View传递给它的specSize;
当父View的测量模式是UNSPECIFIED时:
父View对FrameLayout的尺寸不做限制,要多大就多大;
从代码逻辑上来看,FrameLayout只有在父View的测量模式是AT_MOST的时候,才有可能打破约束。打破约束的后果就是测量结果被带上MEASURED_STATE_TOO_SMALL 的标记,用于告诉父View给定的空间太小。
写个布局验证一下:
1 2 3 4 5 6 7 8 9 10 11 12 13 14 <LinearLayout android:layout_width ="200px" android:layout_height ="200px" app:layout_constraintStart_toStartOf ="parent" app:layout_constraintTop_toTopOf ="parent" > <com.example.myapplication.CustomFrameLayout android:layout_width ="wrap_content" android:layout_height ="wrap_content" > <ImageView android:id ="@+id/iv" android:layout_width ="300px" android:layout_height ="300px" /> </com.example.myapplication.CustomFrameLayout > </LinearLayout >
重写FrameLayout的onMeasure方法,打印出测量结果:
1
2
3
4
5
6
7
8
9
10
class CustomFrameLayout { override fun onMeasure (widthMeasureSpec: Int , heightMeasureSpec: Int ) super .onMeasure(widthMeasureSpec, heightMeasureSpec) Log.d(TAG, "onMeasure() >>> width=$measuredWidth , height=$measuredHeight , state=$measuredState " ) findViewById<View>(R.id.iv)?.apply { Log.d(TAG, "onMeasure() >>> iv_width=$measuredWidth , iv_height=$measuredHeight , iv_state=$measuredState " ) } } }
从日志来看,FrameLayout确实对这种情况不对子View的大小做处理,而是带上MEASURED_STATE_TOO_SMALL 的标记向上通知它的父View。
1
2
3
4
CustomFrameLayout: onMeasure() >>> width=200, height=200, state=16777472 CustomFrameLayout: onMeasure() >>> iv_width=300, iv_height=300, iv_state=0 CustomFrameLayout: onMeasure() >>> width=200, height=200, state=16777472 CustomFrameLayout: onMeasure() >>> iv_width=300, iv_height=300, iv_state=0
然而,打破约束的结果是:
子View在屏幕中的显示面积为200px*200px
measuredWidth和measureHeight都为300px
即:
测量上,父View在测量上没有进一步约束子View
布局和绘制上,父View对子View做了进一步约束
“重写”getChildMeasureSpec 但并不是所有的ViewGroup都像FrameLayout一样没有约束子View的测量结果。例如RelativeLayout,上面的CustomFrameLayout换成CustomRelativeLayout,观察日志:
1
2
3
4
CustomRelativeLayout: onMeasure() >>> width=200, height=200, state=0 CustomRelativeLayout: onMeasure() >>> iv_width=200, iv_height=200, iv_state=0 CustomRelativeLayout: onMeasure() >>> width=200, height=200, state=0 CustomRelativeLayout: onMeasure() >>> iv_width=200, iv_height=200, iv_state=0
咦,ImageView的measuredWidth和measuredHeight都成200px了。
阅读代码发现,其实RelativeLayout“重写”了View的静态方法getChildMeasureSpec:
1
2
3
4
5
6
7
8
9
10
11
12
13
14
15
16
17
18
19
private int getChildMeasureSpec (int child int childSize, int startMargin, i int endPadding, int mySize) { ... if (childSize >= 0 ) { childSpecMode = MeasureSpec.EXACTLY; if (maxAvailable >= 0 ) { childSpecSize = Math.min(maxAvailable, childSize); } else { childSpecSize = childSize; } } else if (childSize == LayoutParams.MATCH_PARENT) { ... } else if (childSize == LayoutParams.WRAP_CONTENT) { ... } ... return MeasureSpec.makeMeasureSpec(childSpecSize, childSpecMode); }
在RelativeLayout子View的尺寸为指定值的情况下,RelativeLayout会以maxAvailable和子View的最小值作为specSize,传递给子View测量 —— 相当于把子View约束在RelativeLayout的尺寸下测量。
结论 本质而言,FrameLayout和RelativeLayout对子View约束的根本不同在于传递给子View的MeasureSpec不同:
布局
parentMode = AT_MOST
FrameLayout
EXACTLY + childDimension
RelativeLayout
EXACTLY + Math.min(childDimension, maxAvailable)
子View能否打破约束取决于父View计算子View``MeasureSpec的逻辑,需要根据父View来具体讨论。具体而言:
FrameLayout的子View可以打破约束,使得子View的测量结果比FrameLayout的还要大;
RelaytiveLayout的子View不可以打破约束,如果RelaytiveLayout是AT_MOST并且子View的期望尺寸比RelativeLayout的MeasureSpec.size还要大,RelaytiveLayout会通过传递给子View的MeasureSpec,进而限制子View的大小。
总结 从整体来看,一棵View的测量,涉及到传递和回归的过程:
传递是指父View发起子View的测量请求,并传递约束MeasureSpec的过程
回归是指请求测量和传递MeasureSpec到叶子节点后,叶子节点开始测量,并逐级向上回归测量的过程
从个体来看,每个View都会接受来自父View的约束,View会根据约束以及自身的LayoutParams独立进行测量。
关于父View对子View的约束,主要是使用MeasureSpec对子View的尺寸进行限制,但这种约束,从测量结果上来看,有强制的和非强制的:
非强制限制:子View的测量尺寸有可能比父View的要大 —— 一个例子:FrameLayout
强制限制:子View的测量尺寸必然比父View的要小 —— 一个例子:RelativeLayout
具体的约束逻辑体现在当前ViewGroup的getChildMeasureSpec上。
最终,View通过传递约束,回归测量来解决画多大 的问题。